
If you haven’t heard of the Instant Pot – let me tell you a secret – they’re AMAZING. The Instant Pot is a brand of electric pressure cooker that is also so, so much more than a pressure cooker. It’s not just a pressure cooker. The Instant Pot is also a slow cooker, rice cooker, steamer, yogurt maker, sauté pan and warming pot. It is truly one of the best kitchen tools you can purchase.
I had originally purchased the Instant Pot to replace my slow cooker – and let me tell you I’m DELIGHTED that I did. I love it as a slow cooker, don’t get me wrong. But, by far, the best feature I’ve found is the electric pressure cooker setting.
Gone are the days when you worry about whether the stovetop pressure cooker will explode when you try and bring it up to pressure. You don’t have to run it under cold water to quickly release the pressure (please don’t do this with an electric pressure cooker, you’ll end up buying yourself a new one). You don’t have to count rattles and turn down the heat to make sure it isn’t cooking too high or count whistles for the length of time that you need the food at pressure.
The Instant Pot allows you to brown your food, put the lid on, set the pressure cooking function and walk away. It’ll come up to pressure on its own (don’t forget to check and make sure the vent valve is set to “sealing” or it won’t come up to pressure), then begins to count down. Once it’s cooked at pressure for as long as you’ve told it to, it quits pressure cooking and immediately goes into the “keep warm” phase while the pressure naturally releases. You can wait for the pressure to naturally release (usually about 15-20 minutes), or quick release the pressure by turning the vent valve to “venting”. This will depend on your recipe.
The best part of pressure cooking is that the high pressure helps the food cook much, much faster. But, you don’t need to sacrifice any delicious flavor in a shorter time. Your soups, stews and chilis still taste like they’ve been simmering all day.
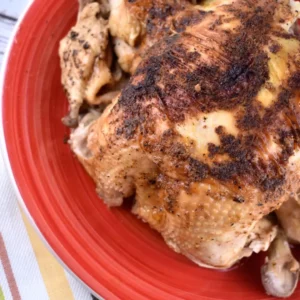
It’s the same with this Slow Cooker Rotisserie Chicken Recipe. This rotisserie chicken has long been a reader favorite here at LaaLoosh, so I thought I’d give it an update with my new kitchen gadget. Believe me, I’m glad I did.
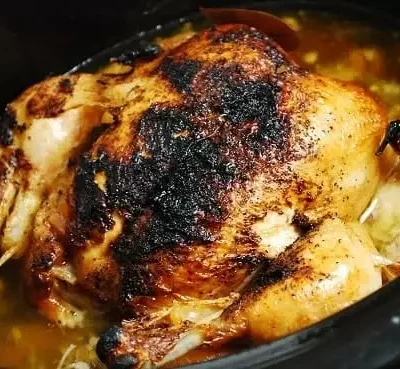
It will take you a few minutes to prepare and season the chicken and then you just let the Instant Pot do its magic. In less than an hour, you’ll have a juicy, tender and ridiculously amazing chicken to enjoy. You can see that mine was so tender that it was just falling apart – forget carving it!
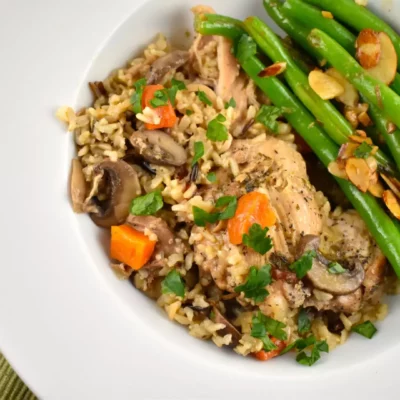
We frequently just eat the chicken for dinner, but it’s also great for me to cook the whole chicken, then debone it and shred the meat. I’ll use the cooked chicken for other recipes later in the week that require rotisserie chicken.
One thing to note, the point value will vary based on the piece of chicken you consume. Breast meat will be fewer points than thigh meat. I’ve calculated the recipe nutrition and point value based on an average of the whole chicken with the skin removed.
MORE INSTANT POT CHICKEN RECIPES
Instant Pot Chicken Enchilada Soup
Instant Pot Chicken and Rice
Instant Pot Rotisserie Chicken Recipe
Ingredients
- 1 4 lb whole chicken
- 1 cup fat free chicken broth or water
- 1 ½ tsp salt
- 1 tsp pepper
- ½ tbsp granulated garlic
- ½ tbsp onion powder
- ½ tbsp paprika
- 1 ½ tbsp avocado oil or coconut oil
Instructions
- Remove all parts from the cavity of the chicken; rinse well and pat dry with paper towels.
- Combine spices and oil in a small bowl, forming a paste. Rub the mixture all over both sides of the chicken.
- Preheat your Instant Pot on “saute” on normal. Once it is well-heated, place chicken in pot, breast side down. Allow to cook for about 3-4 minutes to brown and crisp the skin. Carefully flip the chicken over to the other side, and let it crisp up the skin on that side for another 2- 3 minutes.
- Turn off Instant Pot and add in chicken stock. Place lid on top and lock it. Set to manual high pressure for 25 minutes. Allow the Instant Pot to naturally depressurize, without manually releasing the valve. This takes about 15 minutes.
- Remove lid and transfer chicken to a serving platter. Spoon over some juices from the pot to keep the chicken nice and juicy.


3 Comments
Made this tonight! Chicken was incredibly tender and the flavor was just right for my tastes. I don’t like heavily seasoned meats so the seasonings used in this recipe were perfect for me. My kida loved it and it wasn’t difficult to make. I loved the fact that I can get a rotisserie chicken for under $5 and serve six hungry bellies. That means this recipe is a keeper!
Question-what did you do with the leftover liquid after removing the chicken?
Gena, would I be correct in using the breast meat in 3 oz portion that the SP would be 3?
So the six servings… Would that be two breast halves, two thighs and two legs?
Three ounces of cooked chicken breast without skin = 2 smart points. With skin is 3 smart points. I’m confused about the smart points configuring. Are you considering one half chicken breast to be three ounces and 3 smart points with skin? My experience with a four-pond chicken is that one breast lobe is more than three ounces. Could you please maybe clarify the weights of the portions? It sounds really good! I don’t usually get to eat the skin!